Thursday, August 30, 2012

The Ultimate in Local Sourcing: Growing Your Own!


Please don't run away! It's not that difficult, and nearly everyone (yard or not) can grow at least a few herbs. Hear me out. Gardening doesn't have to be burdensome.

Nothing tastes as fresh as just-snipped oregano, sage, and fennel frond in a homemade Italian tomato sauce. Or some basil and tomato to make a caprese (along with some fresh mozzarella).

A traditional "yard garden" requires a flat, sunny space with well-drained soil. I have a large backyard, and this describes exactly nowhere in it. I plan to install a raised-bed garden, but first a) a loathed mesquite tree must be removed and b) I have to enlist the cooperation of my non-gardener husband. So I garden the next best way-in containers.

My current herb crop includes oregano, sage, parsley (flat and curly leaf), rosemary, basil, thyme, and mint. I planted my fall harvest of peppers (both sweet and hot) and tomatoes a few weeks ago, and today, butternut squash and cucumbers went into the ground. I also have a lemon tree, a lime bush, two olive trees, and a fig tree (unfortunately these last two have yet to produce any fruit).

Yes, keeping a garden going in Texas in sweltering August is a challenge. Water every morning before the heat has kicked in. (Local watering restrictions do not apply when you hand-water.) Having said that, I have had years where everything burned up after days and days of 100+ degree weather.

San Antonio sits in gardening zone 8b (as defined by the USDA), which means we have a nearly nine month growing season (last freeze: March 1-10; first freeze: November 21-30). You can plant spring crops, harvest them, then plant another crop to harvest in the fall. Some herbs will last over the winter, if you cover them during a freeze.

I highly recommend the book "Texas Fruit and Vegetable Gardening" by Greg Grant. He tells you which vegetables, herbs, and fruit trees grow well in Texas (squash, green beans) and which don't (cherries, English peas).

My friend Lynn also gardens. Her current kick is growing vegetables from kitchen scraps; she has celery and garlic, among other things. (Her Pinterest page has hints and photos. Click twice on the photo for instructions.)

Some of her other hints:
  • If you start seeing white spots on your squash leaves, it's powdery mildew; you need to treat them right away or you'll lose the plants. You can buy a fungicide or use some home remedies such as spraying with watered down milk or baking soda.
  • If the summer is too hot for your peppers to make, just ignore the plants and they will yield when it cools down a bit.

My favorite nursery is Hill Country African Violets and Nursery (about 12 miles north of Loop 1604 on IH10; exit Boerne Stage Rd, exit number 543). In season, two of their twelve greenhouses contain seedlings for herbs and vegetables. Their selection is much better than Lowe's or Home Depot, and their prices are great. (I bought four four-inch herb pots, and two six-packs of vegetable seedlings for $12.) They carry a full range of gardening supplies.

I encourage you to purchase a few pots and try your hand at oregano or squash or peppers. With just a little attention, you'll reap tasty rewards.

Thursday, August 23, 2012

Meet the Sapote!

Hello! I am a sapote (sah-POH-tey). I’m about the size of a coconut. Actually, "sapote" is rather vague and also refers to several of my cousins. Specifically, I am a mamey sapote. Laura found me at H-E-B’s Alon Market. When she finds unfamiliar ingredients like me, she usually brings us home.

I am native to southern Mexico. I taste kind of like a tropical peach. Laura found me amongst the guavas and mangos. Use me quickly once you get me home, or I’ll turn all mushy on you. She found this yummy recipe for Frozen Mamey Sapote Mousse (pictured at the bottom), and we’ll go through it together.


1) When you cut through my somewhat leathery skin, don’t be surprised by the big pit in the middle. It should lift right out. You also want to remove any fibrous material lurking around the pit.

2) Scrape out the fruit into a strainer. (A food mill works best, but Laura doesn’t have one. She might try a potato ricer the next time.) This removes any more fibrous material.


3) Now, mix the sugar and salt with the sieved fruit.

4) Soak the gelatin in the cold water, then dissolve it in the boiling water. Blend it with the fruit mixture. Chill until the mix thickens (about two hours).Remove from the fridge and whip until light.

5) Whip the heavy cream until stiff (remember, a cold bowl makes whipping cream a lot easier).


6) Fold the cream into the mamey mixture.


7) Freeze for at least two hours. Remove from freezer one hour prior to serving.


The finished product!


Wednesday, August 15, 2012

Welcome to Laura's Local Kitchen!


A warm welcome to my new blog, Laura’s Local Kitchen! I’ve been doing a lot of cooking and recipe development in the last year. I am happiest when cooking and writing, and I wanted to share some of those discoveries. I plan to focus on cooking with local, seasonal ingredients….but I’ll bet some unusual, not-so-local items will pop up! I hope you will find something that you and your family will enjoy. (By the way, I’ll have a spiffy new logo soon from my talented friend Shauna!)

Several months ago, I noticed a refrigerated van from Greenling (@greenling.com) in our neighborhood. This online grocery delivers to your home (assuming you live in one of their delivery areas). You can order all kinds of things; I placed an order for an every-other-week “local basket,” which contains organic, local, and seasonal produce, a different selection each week. I have had a lot of fun discovering things I’ve never heard of before (mizuna greens??) and finding new uses for familiar ones (see a future post on crispy kale).
My last basket included okra.
No, wait, don’t run away!!! It’s good stuff, really. Give it a try!
Okra’s slime puts off a lot of folks. (See this excellent post on “What makes okra slimy” from Food Republic.) Alton Brown’s Good Eats even aired a whole episode that attempted to rehabilitate okra.
As a fifth-generation Texan, love for okra is in my blood. (Bruce had never eaten it until he met me.) My favorite way to prepare it: fried. (OK, so maybe fried is not as “good for you” as other preparations. But it’s still tasty.)
To ensure success, make the okra slime work to your advantage. This particular recipe (one of my “stand-bys” from Lone Star Legacy II, a 1985 cookbook from the Austin Junior Forum) uses the slime to help the cornmeal batter better adhere to the slices of okra. Another key: making sure your frying oil heats to 360 degrees. Any cooler and the okra will turn out soggy. Any hotter and you risk burning (not to mention setting your kitchen aflame).
If you do it right, you’ll taste none of the slime; just smoky, crunchy okra. We last enjoyed it with a batch of steamed blue crabs.
Fried Okra
1 lb okra, ends trimmed and cut into ¼” rounds
1 C cornmeal
2 T smoked paprika
1 T garlic powder
Salt/pepper to taste
Large pot of salted, boiling water
Vegetable oil (in a deep fryer or cast iron skillet)
1) While the oil is heating, parboil the okra in the boiling water for about five minutes; drain. (Do not let the slime put you off at this point. That’s why you parboil it—to give the cornmeal something to adhere to.) Let cool for a few minutes. (I recommend rinsing the pot and drainer as soon as possible. Slime turns to concrete if you let it dry on your cooking implements.)
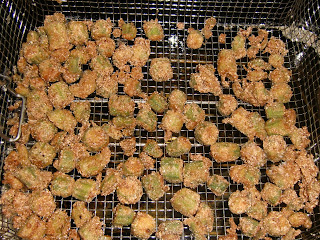
2) Place the cornmeal and spices into a ziptop bag; mix thoroughly. Once the okra has cooled, dump it into the plastic bag and mix thoroughly until all pieces are coated. Pour the coated okra out through a wide-mesh strainer. (I like to use my deep fryer basket.) Shake off excess cornmeal. Let the okra sit for at least 20 minutes. (This further helps the cornmeal to adhere.)
3) While your okra sits, heat up your oil slowly to 360 degrees.
4) Fry the okra until just golden brown (only a few minutes). Remove to a fine-mesh cooling rack over a cookie sheet. (Or take the deep fryer basket out of the oil and let drain above the oil. I don’t like using paper towels, as they can make the okra soggy.) Serve immediately. Serves four.